Intro
Much of this content will be based on the existing docs of Github Pages but with a bit more detailed steps.
We’ll be using Jekyll in this, there are a number of other static website generators (such as Hugo), but since Pages has built in support for Jekyll, that’s where I’d recommend starting.
Prerequisites
You’ll need
- a GitHub account
- Ruby installed
- I’d recommend using RVM so as to not mess with your computer’s installation of Ruby
- [Optional] Your own domain name.
- Register one at a registrar like Namecheap. They’re pretty inexpensive, usually ~$10/year. They often also have deals on free or super cheap domains for students
Note about Windows machines - I’d suggest setting up and using WSL for this. It will simplify installing things greatly.
Your First Website
For this part we’ll make a super basic website to get stuff working
Go to GitHub and make a new repository named yourusername.github.io. Make sure you match your username exactly otherwise this won’t work.
Now on your computer, clone the repository you just created
git clone https://github.com/username/username.github.io
I’m using command line git here but if you’re more comfortable with Desktop that’s fine too.
Next, enter the repository’s directory and create a file named index.html - this’ll be the actual website.
cd username.github.io

echo "Hello World" > index.html
Commit and push your changes
git add --all

git commit -m "Initial commit"

git push -u origin main
Now point your web browser to https://username.github.io/ and you should see your website!
Making it Fancy with Jekyll
Jekyll is a static website generator, meaning it takes easy-to-read Markdown files and turns them into a nice blog format, writing all the messy HTML code itself. It also allows you to use and edit some really complex themes quickly and easily.
This will overrule your index.html website you made earlier, so feel free to delete that now. We’ll still use the repository though, so don’t get rid of that.
Jekyll setup
After you’ve got Ruby installed, install Jekyll with
gem install jekyll
Create the starter site with
jekyll new --skip-bundle .
and find the Gemfile that it just created - this is the file that tells Ruby what packages (or Gems) to install.
Comment out (with a ‘#’) the line gem "jekyll", "~> 4.3.4" and add in the line gem "github-pages", "~> 232", group: :jekyll_plugins. Version 232 is the latest as of writing, but you can check what version to use here. The right version of jekyll will be installed automatically as a dependency of github-pages.
After, your Gemfile should look something like this:
source "https://rubygems.org"

# gem "jekyll", "~> 4.3.4"

# theme
gem "minima", "~> 2.5"

gem "github-pages", "~> 232", group: :jekyll_plugins
# If you have any plugins, put them here!
group :jekyll_plugins do
  gem "jekyll-feed", "~> 0.12"
end

# Windows and JRuby does not include zoneinfo files, so bundle the tzinfo-data
# gem and associated library.
platforms :mingw, :x64_mingw, :mswin, :jruby do
  gem "tzinfo", ">= 1", "< 3"
  gem "tzinfo-data"
end

# Performance-booster for watching directories on Windows
gem "wdm", "~> 0.1", :platforms => [:mingw, :x64_mingw, :mswin]

# Lock `http_parser.rb` gem to `v0.6.x` on JRuby builds since
# newer versions of the gem do not have a Java counterpart.
gem "http_parser.rb", "~> 0.6.0", :platforms => [:jruby]
Install the packages with
bundle install
and add the Gemfile.lock that it just created to your .gitignore file
echo "Gemfile.lock" >> .gitignore
Your website’s URL will still be https://username.github.io/ so put that in the _config.yml file as the url.
Finally, commit your new template website to your repo.
GitHub Actions
“But when I go to my website now, it doesn’t look all fancy! What’s wrong?” - Well, you need to tell GitHub how to build your website now! Don’t worry, it’s very easy.
Go to your repo, then Settings > Pages, and set the “Build and Deployment” dropdown to “GitHub Actions”
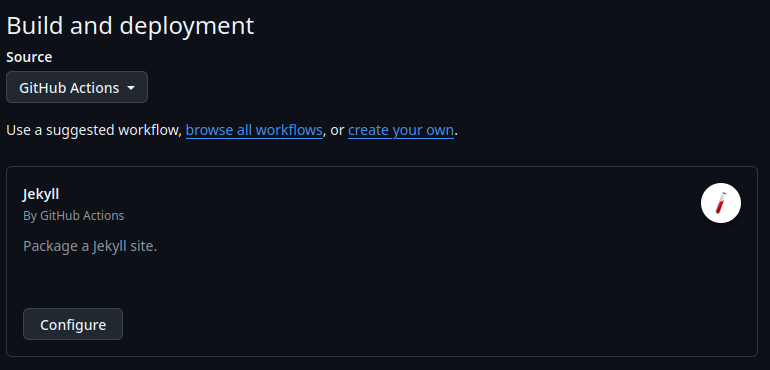
It should auto-detect you’ll be using Jekyll. Click “Configure”, then commit the workflow file it generates. Now, every time there’s a push to the main branch, GitHub will run this action automatically to build the website and deploy it. Pretty sick!
Since you just made a push (the Actions file), the action should be running. Once it’s finished, your new website should be live!

Optionally, you might also want to create a Build-only action tied to pull requests, to make sure your PRs build properly before commiting to main. Make a second .github/workflows/jekyll.yml file and remove the deploy job. Replace the on: options with
on: [pull_request, workflow_dispatch]
Themes
There are many Jekyll themes available, some much more complicated than others. We’ll show off a simple one, “minimalist”.
To start with, we want to change the theme in the Gemfile, so it’s installed. Replace the old minima theme with jekyll-theme-minimalist
# theme
# gem "minima", "~> 2.5"
gem "jekyll-theme-minimalist"
Then we need to change the _config.yml file as well, replacing minima with jekyll-theme-minimalist.
theme: jekyll-theme-minimalist
We’ll also take the time here to copy over some other new things from the theme’s config file:
logo: /assets/img/logo.png
color-scheme: auto

# You can find fonts from https://iconify.design or https://fontawesome.com. Below is just an example illustrating how to use custom icons
sidebar:
  - name: Google Scholar
    icon: <svg xmlns="http://www.w3.org/2000/svg" aria-hidden="true" role="img" style="vertical-align:-0.125em;" width="1em" height="1em" preserveAspectRatio="xMidYMid meet" viewBox="0 0 24 24"><path d="M5.242 13.769L0 9.5L12 0l12 9.5l-5.242 4.269C17.548 11.249 14.978 9.5 12 9.5c-2.977 0-5.548 1.748-6.758 4.269zM12 10a7 7 0 1 0 0 14a7 7 0 0 0 0-14z" fill="currentColor"/></svg>
    link: https://scholar.google.com/citations?user=9G2QHEMAAAAJ&hl=en
  - name: GitHub
    icon: <i class="fa-brands fa-github"></i>
    link: https://github.com/jakobottar
  - name: Blog
    icon: <i class="fa-solid fa-pen"></i>
    link: https://www.jakobj.dev/
  - name: Project Repository
    icon: <svg xmlns="http://www.w3.org/2000/svg" aria-hidden="true" role="img" style="vertical-align:-0.125em;" width="1em" height="1em" preserveAspectRatio="xMidYMid meet" viewBox="0 0 16 16"><g fill="currentColor"><path d="M12.643 15C13.979 15 15 13.845 15 12.5V5H1v7.5C1 13.845 2.021 15 3.357 15h9.286zM5.5 7h5a.5.5 0 0 1 0 1h-5a.5.5 0 0 1 0-1zM.8 1a.8.8 0 0 0-.8.8V3a.8.8 0 0 0 .8.8h14.4A.8.8 0 0 0 16 3V1.8a.8.8 0 0 0-.8-.8H.8z"/></g></svg>
    link: https://youtu.be/dQw4w9WgXcQ
We’ve also got to change the layout tags in index.md and about.md to default.
Run bundle exec jekyll build and bundle exec jekyll serve to see the changes locally, or commit the changes and push them live.
Other Resources/Notes
Using cs.utah.edu home pages
TODO:
Newer versions of Jekyll
Many themes rely on more recent versions of Jekyll than version 3.10 required in github-pages. You can often replace the github-pages gem with a few markdown converters such as
gem "jemoji"
gem "kramdown-parser-gfm"
and still retain the same functionality. Remember, the GitHub Action is basically just bundle install & jekyll build.
Other Generators
GitHub Pages is pretty powerful and is able to serve statically generated sites from any generator (You just point it to the HTML files). You can also automate these with GitHub Actions as well.